
15-Minute Oyakodon (Japanese Chicken & Egg Rice Bowl)

Have you ever craved a comforting bowl of food that feels like a warm hug from your favorite Japanese grandma? That’s exactly what Oyakodon delivers—tender chicken, silky eggs, and sweet onions all simmered in a savory broth, piled high over steaming rice. I’ve been making this Oyakodon for years, and it’s become my go-to weeknight meal because it’s so simple yet incredibly satisfying. The name “Oyakodon” means “parent and child” in Japanese, referring to the chicken and egg duo, and let me tell you, that harmony shines through in every bite.
What I love most about preparing Oyakodon at home is how it brings those authentic flavors without needing a fancy restaurant. In my experience, a few quality ingredients and about 20 minutes on the stove transform basic pantry staples into something magical. If you’re new to Japanese home cooking, this easy Oyakodon recipe is the perfect entry point—it’s forgiving, flavorful, and always hits the spot. I’m excited to share my version with you, complete with tips to make your Oyakodon even better.
Let’s be honest, in a world of complicated recipes, who doesn’t want something straightforward like this? Whether you’re cooking for one or a family, Oyakodon adapts effortlessly. Dive in with me, and you’ll see why it’s a staple in my kitchen.
Grab This Chef Knife Now - Almost Gone!

- Stays Razor-Sharp: Ice-hardened blade keeps its edge longer than ordinary knives
- Superior Grip Control: Unique finger hole design gives you perfect balance and safety
- Built to Last a Lifetime: Premium stainless steel blade with elegant beech wood handle
- ✓ Finally, a knife that stays sharp and feels comfortable in my hand
- ✓ Professional quality without the premium price tag
- ✓ Makes meal prep faster and more enjoyable
⏰ Only a few items left in stock - order soon
Key Takeaways:
- Oyakodon is a quick Japanese rice bowl featuring chicken and egg in a savory-sweet sauce.
- Ready in under 30 minutes, making it ideal for busy weeknights without sacrificing flavor.
- The combination of umami-rich broth and creamy eggs creates an irresistible taste profile.
- Use fresh ingredients and don’t overcook the eggs for the silkiest Oyakodon texture.
- Store leftovers in the fridge for up to 2 days and reheat gently to maintain quality.
Why You’ll Adore This Oyakodon
Comfort in Every Bite: There’s something deeply soothing about the way the tender chicken and soft eggs meld together in Oyakodon. It’s like a cozy blanket for your taste buds, especially on chilly evenings. I’ve found that this dish never fails to lift my mood after a long day.
Quick and Effortless Prep: You won’t believe how fast this comes together—most of the magic happens in one pan. We all need meals like Oyakodon that save time without skimping on deliciousness. In my kitchen, it’s a lifesaver for those rushed dinners.
Authentic Flavors at Home: Recreating restaurant-style Oyakodon doesn’t require special equipment or skills. The balance of sweet mirin and salty soy sauce brings that true Japanese essence right to your table. It’s rewarding to nail those flavors yourself.
Versatile for Any Meal: Breakfast, lunch, or dinner—this Oyakodon fits perfectly into any schedule. I love how customizable it is, letting you tweak it to your preferences. You’ll find yourself coming back to it again and again.
Grab This Kitchen Scale Now — Best Precision Pick!

- Razor-Accurate Every Time: Dual-increment precision down to 0.1g — perfect for baking, meal prep, and portion control with g, oz, ml, and fl'oz modes.
- Smart Removable Bowl Design: Detachable bowl doubles as a protective case for compact storage. Tare function lets you weigh ingredients in any container with zero fuss.
- Built for Everyday Convenience: Auto-zero, tare function, low battery alert, overload indicator, and 2-minute auto-off to extend battery life — all in a sleek stainless steel build.
- ✓ "Perfect for baking — precise, lightweight, and stores easily without wasting counter space"
- ✓ "A game changer! Weighing ingredients is now way more accurate than measuring cups"
- ✓ "Love the 0.1g precision and backlight — best food scale I've owned. Highly recommend!"
⏰ Only a few items left in stock - order soon

Essential Ingredients for Oyakodon
Chicken Thighs: Boneless, skinless chicken thighs are the star protein in this dish, providing juicy tenderness that absorbs the flavorful broth beautifully. I always opt for thighs over breasts because they stay moist during the quick simmer, ensuring every piece in your Oyakodon is succulent. Slice them into bite-sized pieces for even cooking, and you’ll love how they pair with the eggs. In my experience, fresh thighs make all the difference in achieving that authentic texture.
Eggs: Fresh eggs are crucial, as they’re gently poached right in the sauce for a creamy, custard-like finish that defines Oyakodon. Use large eggs and beat them lightly to get that signature silky drape over the chicken and onions. They add richness and bind everything together without overpowering the other flavors. Don’t skip this—it’s what elevates your homemade Oyakodon to restaurant quality.
Onions: Sweet onions, thinly sliced, soften and caramelize slightly in the broth, adding a subtle sweetness that balances the savory elements of Oyakodon. They release their natural sugars during cooking, enhancing the overall depth of the dish. In traditional recipes, onions are key for that layered flavor profile. I’ve tried different varieties, but yellow onions work best for their mild taste in this Oyakodon preparation.
How to Make Oyakodon
Prepare the Broth and Sauté Onions
Start by whisking together dashi, soy sauce, mirin, sake, and a touch of sugar in a small bowl—this forms the umami-packed base for your Oyakodon. Heat a bit of oil in a large skillet over medium heat, then add thinly sliced onions and cook until they’re translucent and fragrant, about 3-4 minutes. This step builds the foundational flavors, releasing the onions’ natural sweetness that will infuse the entire dish. Once softened, pour in the broth mixture and let it come to a gentle simmer, allowing the onions to absorb those savory notes. In my experience, patience here prevents a watery Oyakodon later on. Keep an eye on the heat to avoid boiling too vigorously.
Add and Cook the Chicken
Nestle bite-sized chicken thigh pieces into the simmering broth with the onions, spreading them out evenly for uniform cooking. Let the chicken cook through for about 5-7 minutes, stirring occasionally until it’s opaque and tender—this ensures it’s fully poached in the flavorful liquid without drying out. The aromas filling your kitchen will be incredible, hinting at the delicious Oyakodon to come. I like to taste the broth at this point and adjust sweetness if needed, as it intensifies as it reduces slightly. Sensory-wise, you’ll notice the chicken plumping up beautifully, ready for the next layer. Timing is key; overcooking here can make the meat tough, so watch closely.
Finish with Eggs and Serve
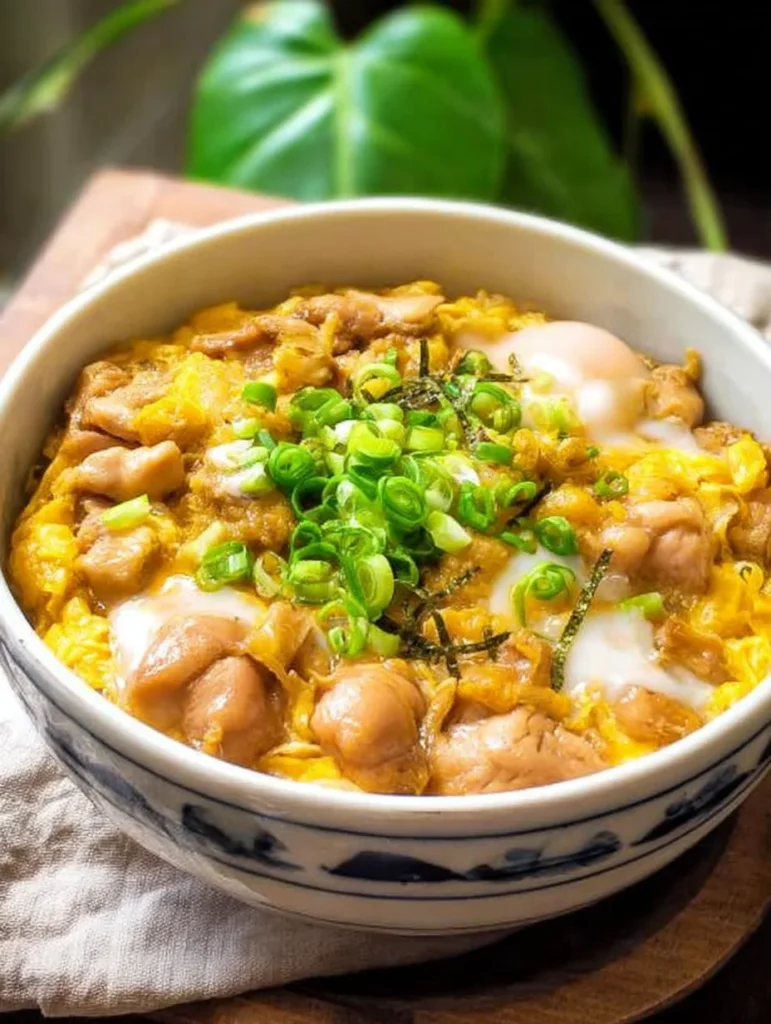
Lightly beat your eggs in a bowl, then drizzle them over the chicken and onion mixture in a circular motion, creating those lovely wispy strands. Cover the skillet and cook on low for 1-2 minutes until the eggs are just set but still soft— this is the heart of a perfect Oyakodon. The steam gently poaches them, resulting in a creamy texture that clings to every bite. Spoon the mixture generously over hot cooked rice in bowls, letting the juices soak in for maximum flavor. I’ve learned that serving immediately preserves the eggs’ silkiness, making your Oyakodon utterly irresistible. For an extra touch, garnish with scallions if you like a fresh contrast.
Ingredients
- 2 boneless, skinless chicken thighs, cut into bite-sized pieces
- 2 medium onions, thinly sliced
- 3 large eggs, lightly beaten
- 1 cup dashi broth
- ¼ cup soy sauce
- ¼ cup mirin
- 2 tablespoons sake
- 1 tablespoon sugar
- 2 cups cooked Japanese short-grain rice
- Optional: sliced green onions for garnish
Oyakodon Instructions
- In a small bowl, combine dashi, soy sauce, mirin, sake, and sugar; stir until sugar dissolves.
- Heat oil in a skillet over medium heat; add sliced onions and cook until softened, about 3 minutes.
- Add the broth mixture to the skillet and bring to a simmer.
- Add chicken pieces, cooking for 5-7 minutes until no longer pink.
- Drizzle beaten eggs over the top, cover, and cook for 1-2 minutes until eggs are set.
- Divide cooked rice into bowls and top with the chicken-egg mixture.
- Serve hot, garnished if desired.

Pro Tips for the Best Oyakodon
Use High-Quality Dashi: Opt for homemade or instant dashi packets for the most authentic umami flavor in your Oyakodon— it makes a world of difference.
Don’t Overbeat the Eggs: Lightly whisk them to keep that delicate, ribbon-like texture when they hit the hot broth.
Adjust Sweetness to Taste: Taste the sauce midway and add a pinch more sugar if you prefer a sweeter Oyakodon profile.
You Must Know
- Oyakodon traditionally uses chicken thighs for their juiciness and flavor absorption.
- The dish is best served immediately to enjoy the soft-set eggs at their peak.
- It’s a one-pan wonder, minimizing cleanup while maximizing taste.
- Portions are typically for 2 servings, but it scales easily for more.
How to Store Oyakodon
To keep your Oyakodon fresh, transfer leftovers to an airtight container and refrigerate promptly—it’ll last up to 2 days without losing much appeal. Avoid freezing, as the eggs can become rubbery upon thawing, altering the beloved texture. For reheating, gently warm in a skillet over low heat with a splash of water to revive the broth, or microwave in short bursts, stirring halfway. This method ensures your Oyakodon tastes almost as good as fresh.
Customizing Your Oyakodon
Feeling adventurous? Swap chicken for pork or tofu to create a vegetarian twist on this classic Oyakodon while keeping the sauce intact. Add veggies like mushrooms or spinach during the onion sauté for extra nutrition without complicating things. In my experience, a dash of sesame oil at the end brings a nutty depth. For spice lovers, incorporate shichimi togarashi—simple changes keep your Oyakodon exciting. Check out this Thai satay chicken recipe for more Asian-inspired variations.
What to Serve with Oyakodon
Pair your Oyakodon with a crisp green salad dressed in sesame ginger vinaigrette to cut through the richness—it’s a refreshing contrast. Miso soup on the side adds warmth and complements the umami theme beautifully. For something heartier, try pickled cucumbers or radish for that tangy crunch. Don’t forget a hot cup of green tea to round out the Japanese meal experience, making it feel complete and balanced.
15-Minute Oyakodon (Japanese Chicken & Egg Rice Bowl)
This quick & easy Oyakodon features tender pieces of chicken simmered in a sweet and savory broth and wrapped in a soft egg scramble to be served over a warm bed of rice. This simple & delicious donburi comes together in a single pan in just a few minutes, making it the ideal comfort meal for the weekdays.
Timing
Recipe Details
Ingredients
- 01 150 g skinless boneless chicken thighs (cut into small pieces)
- 02 1/2 medium onion (sliced)
- 03 1/2 cup chicken stock (or dashi)
- 04 1 tbsp soy sauce (or more to taste)
- 05 1 tbsp mirin
- 06 1 tsp sugar
- 07 2 large eggs
- 08 1 1/2 cup cooked rice (to serve)
- 09 green onion, sesame oil, nori and/or togarashi (optional, for garnish)
Instructions
Combine chicken, soy sauce, mirin, and sugar in a bowl and set aside for 5-10 minutes while preparing the other ingredients.
To prepare the egg mixture, crack the eggs into a bowl and gently break the yolks using a pair of chopsticks. You want to make sure the eggs are lightly beaten with the egg whites still visible.
In a small pan, bring chicken stock to a boil over medium heat. Add onion and cook until aromatic, about 1 minute. Add the chicken mixture and cook for about 1-2 minutes on each side.
When the chicken is almost cooked through, pour the egg mixture evenly into the pan and cook for a few seconds until the edges are nearly set.
Lightly scramble the eggs and cook for a few seconds more until the eggs are still a bit runny - the residual heat will continue to cook the eggs. Serve over a bowl of rice, garnish and enjoy!
FILED UNDER:
NUTRITION FACTS (PER SERVING)
Nutrition information is calculated using an ingredient database and should be considered an estimate. In cases where multiple ingredient alternatives are given, the first listed is calculated for nutrition. Garnishes and optional ingredients are not included.
Frequently Asked Questions About Oyakodon
Can I make Oyakodon ahead of time?
You can prepare the broth and chop ingredients in advance, but cook the eggs fresh for the best texture in your Oyakodon. Assembling everything right before serving keeps it at its peak. It’s not ideal for full make-ahead, as the eggs firm up quickly.
How long does Oyakodon last in the fridge?
Stored properly in an airtight container, Oyakodon stays good for 1-2 days. Beyond that, the flavors might mellow, but it’s safe if reheated thoroughly. Always check for off smells before eating leftovers.
Is Oyakodon gluten-free?
Traditional Oyakodon uses soy sauce, which contains gluten, so opt for tamari as a substitute to make it gluten-free. The rest of the ingredients are naturally gluten-free. This simple swap keeps your Oyakodon accessible for everyone.
What’s the origin of Oyakodon?
Oyakodon hails from Japan, specifically popularized in the early 20th century as an affordable, comforting dish. The “oya” for parent (chicken) and “ko” for child (egg) playfully describes its ingredients. It’s a staple in homes and izakayas alike, beloved for its simplicity.
Can I use chicken breast for Oyakodon?
Yes, chicken breast works in a pinch for Oyakodon, but thighs are preferred for their tenderness and flavor. Breast can dry out if overcooked, so monitor closely. Thighs truly elevate the dish’s moisture and taste.
How spicy is Oyakodon?
Oyakodon isn’t spicy at all—it’s savory-sweet with no heat unless you add it. For a kick, sprinkle chili flakes on your finished Oyakodon. This keeps the authentic profile while allowing personalization.
Can kids eat Oyakodon?
Absolutely, Oyakodon is kid-friendly due to its mild flavors and familiar ingredients like chicken and eggs. They often love the soft textures over rice. It’s a great intro to Japanese cuisine for little ones.
What’s the calorie count for Oyakodon?
A standard serving of Oyakodon is around 500-600 calories, depending on rice portion. It’s balanced with protein and carbs. For lighter options, reduce rice or use less oil. See this air fryer chicken skewers recipe for a low-cal alternative.
Final Thoughts
From the first simmer to that last satisfying bite, this Oyakodon recipe captures everything I love about simple, soul-warming food. It’s proof that great meals don’t need to be complicated—just thoughtful ingredients and a bit of care. I encourage you to give it a try tonight; you might just find your new family favorite. If you make it, share your twists—I’d love to hear how your Oyakodon turned out!


