Buckeye Bars

There’s something magical about Buckeye Bars that takes me right back to holiday gatherings in Ohio, where these peanut butter and chocolate treats are practically a tradition. If you’ve never tried making Buckeye Bars, you’re in for a treat—they’re like the buckeye candies we all love, but in easy-to-share bar form that doesn’t require dipping each one individually. In my experience, the creamy peanut butter center paired with that glossy chocolate top is pure bliss, and I’ve lost count of how many times I’ve whipped up a batch for potlucks or just a cozy night in. What I love most is how simple they are to prepare, no baking needed, yet they look and taste like something from a fancy bakery. Let’s dive into this recipe for Buckeye Bars, and I promise it’ll become your new go-to dessert.
Here’s the thing: Buckeye Bars aren’t just delicious; they’re versatile too. You can tweak them for different occasions, adding a touch of flair that makes them feel special every time. I’ve shared variations with friends, and they always ask for the recipe—it’s that crowd-pleasing. Now, you might be thinking, “Peanut butter and chocolate? Classic combo!” And you’re right, but these bars elevate it with their no-fuss method. I’m excited to walk you through every step so you can create your own batch of these irresistible Buckeye Bars.
Key Takeaways:
- Buckeye Bars are a no-bake dessert featuring creamy peanut butter and rich chocolate layers for ultimate indulgence.
- Prep time is just 20 minutes, plus chilling, making them a quick treat for busy days.
- The perfect balance of sweet and salty flavors will have everyone coming back for seconds.
- Chill the Buckeye Bars thoroughly before cutting for clean slices and best texture.
- Store in the fridge for up to a week, or freeze for longer enjoyment.
Why You’ll Adore This Buckeye Bars
No-Bake Convenience: Imagine whipping up a decadent dessert without turning on the oven— that’s the beauty of these Buckeye Bars. In my kitchen trials, I’ve found this method saves time and keeps the house cool, especially during summer parties. You’ll love how effortlessly they come together, leaving you more time to enjoy the fruits of your labor.
Grab This Chef Knife Now - Almost Gone!

- Stays Razor-Sharp: Ice-hardened blade keeps its edge longer than ordinary knives
- Superior Grip Control: Unique finger hole design gives you perfect balance and safety
- Built to Last a Lifetime: Premium stainless steel blade with elegant beech wood handle
- ✓ Finally, a knife that stays sharp and feels comfortable in my hand
- ✓ Professional quality without the premium price tag
- ✓ Makes meal prep faster and more enjoyable
⏰ Only a few items left in stock - order soon
Irresistible Flavor Combo: Peanut butter and chocolate are a match made in heaven, but in Buckeye Bars, it’s next-level creamy and crunchy. I always get compliments on the smooth filling that melts in your mouth, contrasted by the snappy chocolate top. It’s the kind of treat that satisfies any sweet tooth without overwhelming.
Easy to Share and Customize: These bars are perfect for gatherings because they slice neatly and serve a crowd. What I find interesting is how you can add nuts or sea salt to your Buckeye Bars for a personal twist. They’re forgiving for beginners yet impressive enough for bakers of all levels.
Make-Ahead Magic: Life gets hectic, but with Buckeye Bars, you can prepare ahead and still have fresh-tasting treats. I’ve made them a day early for events, and they hold up beautifully in the fridge. The flavors even deepen slightly, making each bite more delicious over time.
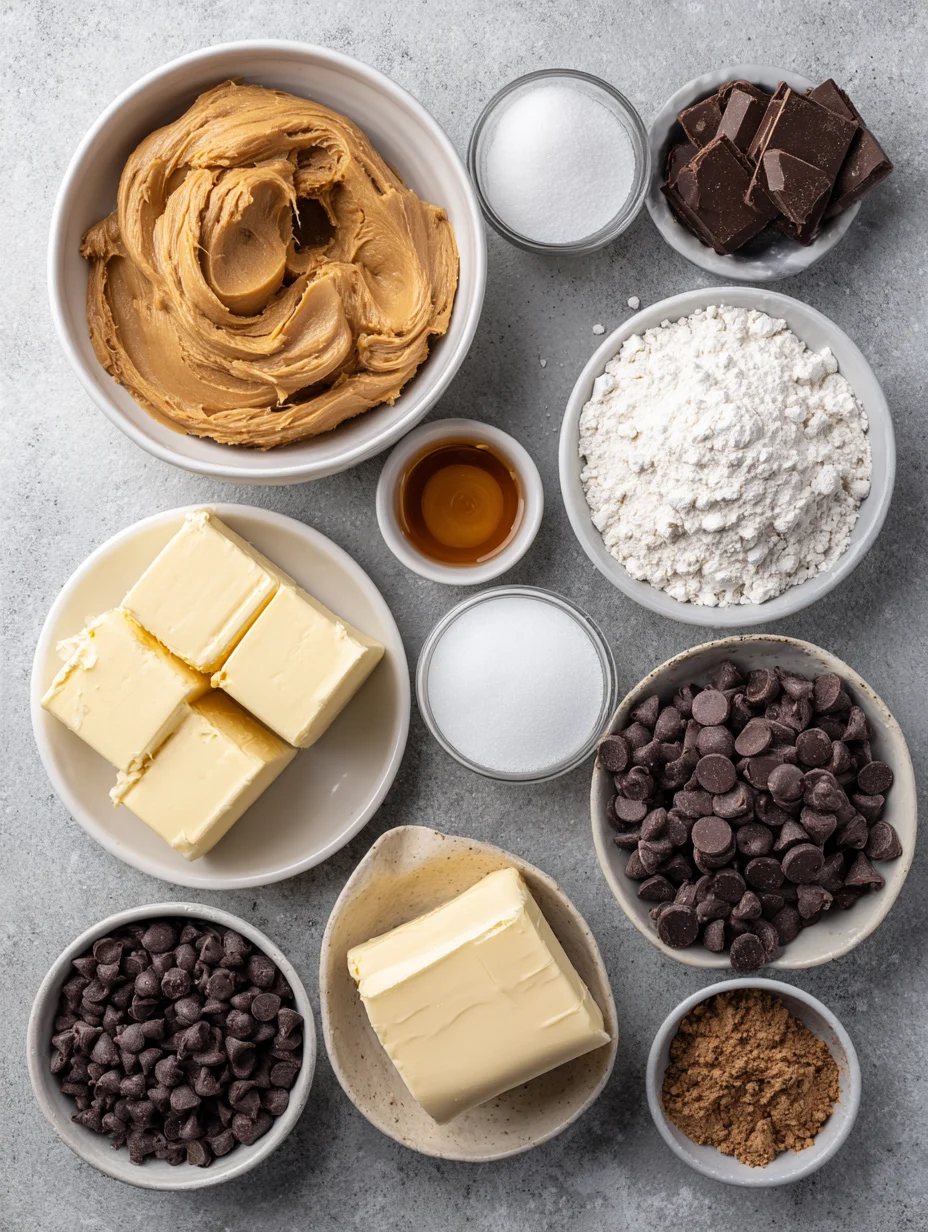
Essential Ingredients for Buckeye Bars
Creamy Peanut Butter: This is the heart of your Buckeye Bars, providing that rich, nutty flavor we all crave. I prefer using natural peanut butter for a smoother texture, but the standard kind works wonders too—about 1 1/2 cups will do. It binds everything together with its creamy consistency, ensuring the base holds up under the chocolate layer without crumbling. In my experience, don’t skimp here; quality peanut butter elevates the entire dessert.
Grab This Kitchen Scale Now — Best Precision Pick!

- Razor-Accurate Every Time: Dual-increment precision down to 0.1g — perfect for baking, meal prep, and portion control with g, oz, ml, and fl'oz modes.
- Smart Removable Bowl Design: Detachable bowl doubles as a protective case for compact storage. Tare function lets you weigh ingredients in any container with zero fuss.
- Built for Everyday Convenience: Auto-zero, tare function, low battery alert, overload indicator, and 2-minute auto-off to extend battery life — all in a sleek stainless steel build.
- ✓ "Perfect for baking — precise, lightweight, and stores easily without wasting counter space"
- ✓ "A game changer! Weighing ingredients is now way more accurate than measuring cups"
- ✓ "Love the 0.1g precision and backlight — best food scale I've owned. Highly recommend!"
⏰ Only a few items left in stock - order soon
Powdered Sugar: Sweetness is key in Buckeye Bars, and powdered sugar delivers it finely without graininess. You’ll need around 3 cups to create a dough-like mixture that’s easy to press into the pan. It balances the saltiness of the peanut butter perfectly, giving the bars their signature fudgy interior. I’ve tried granulated sugar before, but it just doesn’t dissolve as well—stick with powdered for the best results.
Semi-Sweet Chocolate Chips: For the glossy top that makes Buckeye Bars so tempting, semi-sweet chocolate chips are ideal—use 2 cups melted with a bit of butter. They provide just the right amount of bitterness to cut through the sweetness below. Melting them creates a smooth, dippable layer that’s simple yet luxurious. In these bars, the chocolate sets firmly, offering a satisfying snap with every piece.
How to Make Buckeye Bars
Prepare the Peanut Butter Base
Start by softening your butter and mixing it with creamy peanut butter in a large bowl until smooth—this forms the foundation of your Buckeye Bars. Gradually add powdered sugar and a dash of vanilla, stirring until it comes together like a soft dough you can press easily. In my experience, using a stand mixer makes this effortless, but a sturdy spoon works fine too; just ensure no lumps remain for that perfect texture. Line an 8×8-inch pan with parchment paper, then firmly press the mixture into the bottom, creating an even layer about 1/2-inch thick. This step sets the stage for the decadent Buckeye Bars you’ll soon enjoy.
Melt and Spread the Chocolate Topping
Now, for the chocolate layer: melt semi-sweet chocolate chips with a couple tablespoons of butter over low heat or in the microwave in short bursts, stirring frequently to avoid scorching. The key here is patience—aim for a silky, pourable consistency that spreads effortlessly. Once ready, pour it over the peanut butter base and use an offset spatula to smooth it out evenly, ensuring every inch of your Buckeye Bars gets covered. I love watching the chocolate settle; it smells amazing and promises that glossy finish we’re after.
Chill and Set the Buckeye Bars
Pop the pan into the fridge for at least 2 hours, or until the chocolate is fully set and firm to the touch—this chilling time is crucial for clean cuts later. You’ll notice the layers bonding beautifully, with the peanut butter peeking through subtly under the chocolate. In my kitchen, I sometimes leave them overnight for even better results, as the flavors meld overnight. Once set, lift out using the parchment, then slice into squares—your homemade Buckeye Bars are ready to devour, with that classic Ohio-inspired taste in every bite.
Ingredients
- 1/2 cup unsalted butter, softened
- 1 1/2 cups creamy peanut butter
- 3 cups powdered sugar
- 1 teaspoon vanilla extract
- 2 cups semi-sweet chocolate chips
- 2 tablespoons unsalted butter, for melting with chocolate
Buckeye Bars Instructions
- In a large mixing bowl, beat together the softened butter and peanut butter until creamy and well combined.
- Gradually mix in the powdered sugar and vanilla extract until a thick dough forms; this should take about 2-3 minutes.
- Press the mixture evenly into a parchment-lined 8×8-inch baking pan, using the back of a spoon or your hands for a flat surface.
- In a microwave-safe bowl, melt the chocolate chips and 2 tablespoons of butter in 30-second intervals, stirring after each until smooth.
- Pour the melted chocolate over the peanut butter layer and spread it evenly with a spatula.
- Refrigerate for at least 2 hours or until set, then cut into bars and serve.

Pro Tips for the Best Buckeye Bars
Room Temperature Butter: Always use softened butter for the base to ensure it mixes smoothly—cold butter leads to lumps in your Buckeye Bars.
Low and Slow Melting: Melt chocolate gently to prevent seizing; this keeps the topping glossy and perfect for your bars.
Sharp Knife for Slicing: Use a hot knife to cut through the chocolate layer cleanly, avoiding cracks on your beautiful Buckeye Bars.
You Must Know
- Buckeye Bars are inspired by Ohio’s state tree nut, hence the peanut butter “buckeye” shape in traditional candies.
- No baking is required, making them ideal for hot weather or quick prep.
- They contain peanuts, so check for allergies before serving to guests.
- Chilling time can be shortened with a freezer, but don’t rush it too much to avoid uneven setting.
How to Store Buckeye Bars
To keep your Buckeye Bars fresh, store them in an airtight container in the fridge for up to one week—they actually taste even better after a day or two as flavors intensify. For longer storage, wrap individual pieces in plastic and freeze for up to three months; thaw in the fridge before enjoying. Avoid leaving them at room temperature for more than a couple hours, as the chocolate can soften quickly in warmth.
Customizing Your Buckeye Bars
Feeling adventurous? Swap in crunchy peanut butter for added texture in your Buckeye Bars, or mix in chopped peanuts for extra crunch without much effort. If you’re watching sugar, try a sugar-free powdered sugar substitute, though it might alter the firmness slightly—I’ve had success with it in smaller batches. For a twist, drizzle melted white chocolate on top post-chilling, or check out our peanut butter brownie swirl cookies recipe for more inspiration on nutty treats.
What to Serve with Buckeye Bars
Pair these rich Buckeye Bars with a scoop of vanilla ice cream for an ultimate sundae experience, or serve alongside fresh berries to cut through the sweetness. For beverages, a cold glass of milk is classic, but try coffee or hot cocoa to complement the chocolate notes. If hosting, add them to a dessert platter with lighter options like fruit salad or yogurt parfaits for balance.
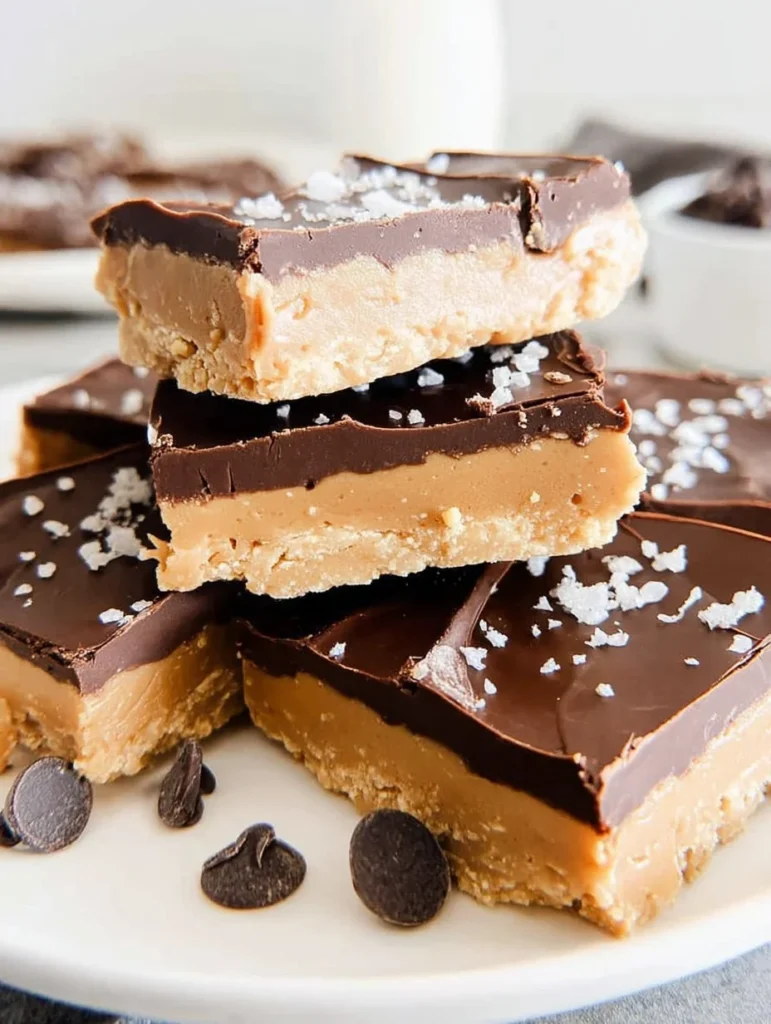
Buckeye Bars
Buckeye bars are a naturally gluten-free no-bake dessert made with the classic combination of a peanut butter and chocolate layered and sliced into perfect handheld dessert bars!
Timing
Recipe Details
Ingredients
- 01 1 cup creamy peanut butter
- 02 1 stick butter ((softened))
- 03 1 teaspoon vanilla extract
- 04 2 ½ cups powdered sugar ((do not pack))
- 05 2 cups chocolate chips
- 06 2 tablespoons coconut oil ((optional))
Instructions
Line a square 9x9 baking dish with parchment paper.
Add the peanut butter and softened butter to the bowl of a stand mixer and beat on medium speed with a paddle attachment until combined thoroughly, scraping down the sides as it blends.
Add the vanilla extract and blend on low speed and then add the powdered sugar slowly. (careful not to over pack the measuring cup. see notes)
Once all powdered sugar is added, continue to mix on low speed until a ball forms. The dough should not be too wet. If it is add a little more powdered sugar.
Transfer the peanut butter mixture to the lined pan and press it down with fingers or he back of wooden spoon (press into the corners well)
In a separate microwave safe bowl, add the chocolate chips and coconut oil and microwave for 30 seconds then stir and heat for 20-30 more seconds.
Pour the melted chocolate mixture over the peanut butter layer and use a spatula to spread the chocolate evenly over top.
Place the bars in the refrigerator for approximately 2 hours to allow the chocolate to fully hardened.
Top with sea salt, if desired.
Notes & Tips
FILED UNDER:
NUTRITION FACTS (PER SERVING)
Nutrition information is calculated using an ingredient database and should be considered an estimate. In cases where multiple ingredient alternatives are given, the first listed is calculated for nutrition. Garnishes and optional ingredients are not included.
Frequently Asked Questions About Buckeye Bars
Can I make Buckeye Bars ahead of time?
Absolutely, Buckeye Bars are perfect for prepping in advance—make them up to two days ahead and store in the fridge. The chilling actually enhances the flavors, so they’re even tastier on day two. Just cover tightly to prevent drying out.
How long does Buckeye Bars last in the fridge?
Your Buckeye Bars will stay fresh in the refrigerator for about a week when kept in an airtight container. Beyond that, the texture might soften slightly, but they’re still delicious. For best taste, enjoy within 4-5 days.
Are Buckeye Bars gluten-free?
Yes, traditional Buckeye Bars are naturally gluten-free since they use simple ingredients like peanut butter and chocolate. Always double-check labels for any additives, but this recipe keeps it safe and simple.
Can I use dark chocolate in Buckeye Bars?
Dark chocolate works wonderfully in Buckeye Bars, adding a deeper, less sweet flavor that balances the peanut butter nicely. Melt it the same way, and you’ll get a sophisticated twist on the classic. In my experience, it pairs great with a sprinkle of sea salt on top.
Why are my Buckeye Bars too soft?
If your Buckeye Bars seem soft, ensure you used the full amount of powdered sugar and chilled them long enough—sometimes an extra hour helps. Room temperature can also play a role, so keep them cool until serving.
How do I cut Buckeye Bars neatly?
For clean slices on Buckeye Bars, use a sharp knife warmed under hot water and wiped dry between cuts—this prevents dragging the chocolate. Let them chill fully first, and you’ll get those picture-perfect squares every time.
Can I add nuts to Buckeye Bars?
Nuts like chopped peanuts or pecans mix in beautifully to Buckeye Bars for added crunch—stir them into the peanut butter base before pressing. It gives a homemade candy bar vibe without complicating the recipe.
What’s the origin of Buckeye Bars?
Buckeye Bars hail from Ohio, named after the buckeye nut due to their resemblance in cross-section. They’re a beloved treat there, often made for holidays, and this easy bar version adapts the traditional peanut butter balls.
Final Thoughts
From the first creamy bite to the last chocolatey crumb, these Buckeye Bars capture everything I love about simple, satisfying desserts that bring people together. I’ve made them countless times, and they never fail to impress—whether for a family treat or a party contribution. Give this recipe a try, and let me know how your batch turns out; you might just start a new tradition of your own with Buckeye Bars.