
Fried Chicken Breast Recipe

There’s nothing quite like the satisfying crunch of a perfectly Fried Chicken Breast straight from the skillet—it’s the kind of comfort food that brings back memories of family gatherings and lazy Sunday dinners. I’ve been making this Fried Chicken Breast recipe for years, tweaking it until it hits that sweet spot of crispy outside and juicy inside. Let me tell you, once you try this homemade Fried Chicken Breast, you’ll wonder why you ever settled for takeout.
In my experience, the secret to great Fried Chicken Breast lies in the simple brine and double-dredge technique that locks in all the flavor. Whether you’re feeding a crowd or just craving something indulgent, this easy Fried Chicken Breast comes together in under an hour. I’m excited to share my go-to method with you—it’s foolproof and always a hit!
Now, you might be thinking, “Fried Chicken Breast? Isn’t that heavy?” But trust me, prepared right, it’s light, flavorful, and pairs beautifully with your favorite sides. Let’s dive in and get you on your way to Fried Chicken Breast perfection.
Grab This Chef Knife Now - Almost Gone!

- Stays Razor-Sharp: Ice-hardened blade keeps its edge longer than ordinary knives
- Superior Grip Control: Unique finger hole design gives you perfect balance and safety
- Built to Last a Lifetime: Premium stainless steel blade with elegant beech wood handle
- ✓ Finally, a knife that stays sharp and feels comfortable in my hand
- ✓ Professional quality without the premium price tag
- ✓ Makes meal prep faster and more enjoyable
⏰ Only a few items left in stock - order soon
Key Takeaways:
- Crispy, juicy Fried Chicken Breast that’s ready in under 45 minutes for busy weeknights.
- Simple ingredients you likely have on hand, no fancy equipment needed.
- Explosive flavor from a seasoned buttermilk brine that keeps every bite tender.
- Pro tip: Pat the chicken dry before dredging for maximum crunch.
- Store leftovers in the fridge for up to 3 days and reheat in the oven for crispiness.
Why You’ll Adore This Fried Chicken Breast
Juicy and Tender Every Time: What I love most about this Fried Chicken Breast is how the buttermilk soak tenderizes the meat without overpowering the natural flavors. It’s like a hug for your taste buds—moist inside, with that irresistible crunch on the outside. You’ll find yourself coming back for seconds, I guarantee it.
Quick and Family-Friendly: In a world of rushed meals, this Fried Chicken Breast stands out for its speed; it’s on the table faster than delivery. We make it often for kids’ dinners, and they devour it every time. Here’s the thing—it’s versatile enough for salads or sandwiches too.
Customizable Flavor Boost: Spice it up with paprika or herbs for a twist on classic Fried Chicken Breast. The base recipe is mild, so everyone can enjoy it, but adding a dash of cayenne brings the heat we crave on cooler evenings. It’s all about making it your own, and that’s what keeps it exciting.
Healthier Frying Method: Using a neutral oil and not overcrowding the pan means less grease and more even cooking for your Fried Chicken Breast. I’ve experimented with air frying, but nothing beats the traditional fry for that golden crust. Plus, it’s a crowd-pleaser that feels indulgent without the guilt.
Grab This Kitchen Scale Now — Best Precision Pick!

- Razor-Accurate Every Time: Dual-increment precision down to 0.1g — perfect for baking, meal prep, and portion control with g, oz, ml, and fl'oz modes.
- Smart Removable Bowl Design: Detachable bowl doubles as a protective case for compact storage. Tare function lets you weigh ingredients in any container with zero fuss.
- Built for Everyday Convenience: Auto-zero, tare function, low battery alert, overload indicator, and 2-minute auto-off to extend battery life — all in a sleek stainless steel build.
- ✓ "Perfect for baking — precise, lightweight, and stores easily without wasting counter space"
- ✓ "A game changer! Weighing ingredients is now way more accurate than measuring cups"
- ✓ "Love the 0.1g precision and backlight — best food scale I've owned. Highly recommend!"
⏰ Only a few items left in stock - order soon
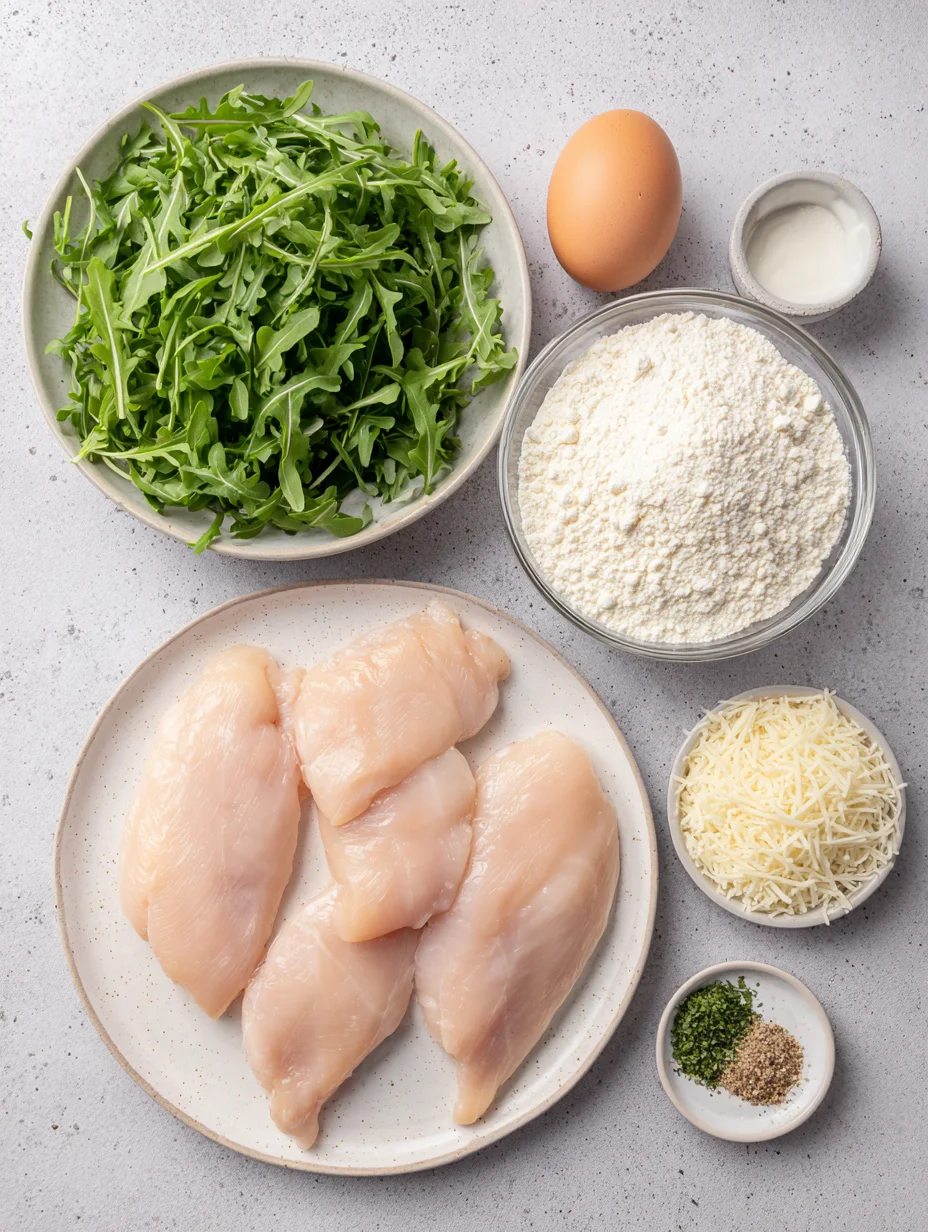
Essential Ingredients for Fried Chicken Breast
Chicken Breasts: Fresh, boneless chicken breasts are the star here—they’re lean yet substantial, perfect for slicing into tenders or keeping whole for a hearty meal. In my experience, choosing thinner cuts ensures even cooking and prevents dryness. For this Fried Chicken Breast, aim for about 1-1.5 pounds to serve four, and always pat them dry to help the coating stick.
Buttermilk: This tangy liquid is a game-changer, breaking down proteins for ultimate tenderness in your Fried Chicken Breast. I like to add a bit of hot sauce to the brine for subtle kick without overwhelming the dish. It’s affordable, widely available, and elevates the whole recipe effortlessly.
Breadcrumbs and Flour: A mix of all-purpose flour and seasoned breadcrumbs creates that iconic crispy shell for Fried Chicken Breast. The flour base absorbs moisture, while panko-style crumbs add extra crunch—I swear by this combo for texture that lasts. Don’t skip seasoning them with salt, pepper, and herbs to infuse every bite with flavor.
How to Make Fried Chicken Breast
Prepare the Buttermilk Brine
Start by whisking together 2 cups of buttermilk, 1 teaspoon of salt, 1/2 teaspoon of black pepper, and a dash of garlic powder in a large bowl. Submerge your 4 chicken breasts in the mixture, ensuring they’re fully coated—I’ve found covering and refrigerating for at least 30 minutes (or up to 4 hours) makes all the difference for juicy Fried Chicken Breast. This step isn’t just about flavor; it’s what keeps the meat tender during frying. If you’re short on time, even 15 minutes helps, but patience here pays off big.
Dredge and Coat the Chicken
Remove the chicken from the brine and pat it dry with paper towels to remove excess moisture, which is key for the coating to adhere properly. Set up three shallow dishes: one with 1 cup flour mixed with spices, one with 2 beaten eggs, and one with 2 cups breadcrumbs seasoned with paprika and herbs. Dip each piece first in flour, shaking off excess, then egg, and finally breadcrumbs, pressing gently to ensure even coverage. The sizzle you’ll hear later is music to my ears, promising crispy results.
Fry to Golden Perfection
Heat 1/2 inch of vegetable oil in a large skillet over medium-high until it reaches 350°F—use a thermometer if you can, as this prevents soggy Fried Chicken Breast. Fry the coated breasts in batches for 6-8 minutes per side, turning once, until golden and the internal temperature hits 165°F. Drain on a wire rack over paper towels to stay crisp; overcrowding leads to steaming, so give them space. Let rest a few minutes before slicing—the juices redistribute for that perfect bite every time.
Ingredients
- 4 boneless, skinless chicken breasts (about 1.5 lbs)
- 2 cups buttermilk
- 1 cup all-purpose flour
- 2 large eggs, beaten
- 2 cups panko breadcrumbs
- 1 tsp salt
- 1/2 tsp black pepper
- 1 tsp garlic powder
- 1 tsp paprika
- Vegetable oil, for frying
Fried Chicken Breast Instructions
- Whisk buttermilk, salt, pepper, and garlic powder in a bowl. Add chicken breasts, cover, and refrigerate for 30 minutes to 4 hours.
- Remove chicken and pat dry. Set up dredging stations: flour with spices, beaten eggs, and seasoned breadcrumbs.
- Dip chicken in flour, then egg, then breadcrumbs, pressing to coat.
- Heat oil in skillet to 350°F. Fry chicken 6-8 minutes per side until golden and 165°F internal temp.
- Drain on wire rack and serve hot.
Pro Tips for the Best Fried Chicken Breast
Don’t Skip the Brine: The buttermilk tenderizes the meat beautifully—I’ve ruined batches without it, so trust the process for your Fried Chicken Breast.
Use a Thermometer: Check oil at 350°F and chicken at 165°F to avoid overcooking and ensure safety every time.
Fry in Batches: Keep the oil hot for crispiness; adding too much at once drops the temp and steams your Fried Chicken Breast.
You Must Know
- This Fried Chicken Breast is best enjoyed fresh, but leftovers reheat well in a 350°F oven for 10 minutes.
- Buttermilk can be substituted with milk plus lemon juice if needed—let it sit 5 minutes to curdle.
- Always use neutral oil like canola to avoid flavor interference in your Fried Chicken Breast.
- Pound thicker breasts to 1/2 inch for even frying and tenderness.
How to Store Fried Chicken Breast
To keep your Fried Chicken Breast fresh, let it cool completely before transferring to an airtight container—it’ll last up to 3 days in the fridge. For longer storage, freeze portions in freezer bags for up to 2 months, though the coating might soften slightly. Reheat in the oven at 375°F for 10-15 minutes to restore crispiness, avoiding the microwave which makes it soggy. I’ve found this method keeps the flavor intact, just like day one.
Customizing Your Fried Chicken Breast
Feeling adventurous? Swap breadcrumbs for crushed cornflakes for extra crunch in your Fried Chicken Breast, or add chili powder to the flour for a spicy kick. If you’re watching carbs, try almond flour instead of wheat—I’ve done this for low-carb nights and it works wonders. For an Asian twist, incorporate soy sauce in the brine, inspired by my favorite easy sesame chicken recipe. These tweaks keep things fresh without complicating the classic.
What to Serve with Fried Chicken Breast
Pair your Fried Chicken Breast with creamy coleslaw and buttery cornbread for a Southern vibe that’s hard to beat. For a lighter option, try a fresh green salad with ranch dressing or roasted veggies to balance the richness. Don’t forget sides like mac and cheese or sweet potato fries—they soak up any extra sauce perfectly. Wash it down with iced tea or a crisp beer for the ultimate meal.

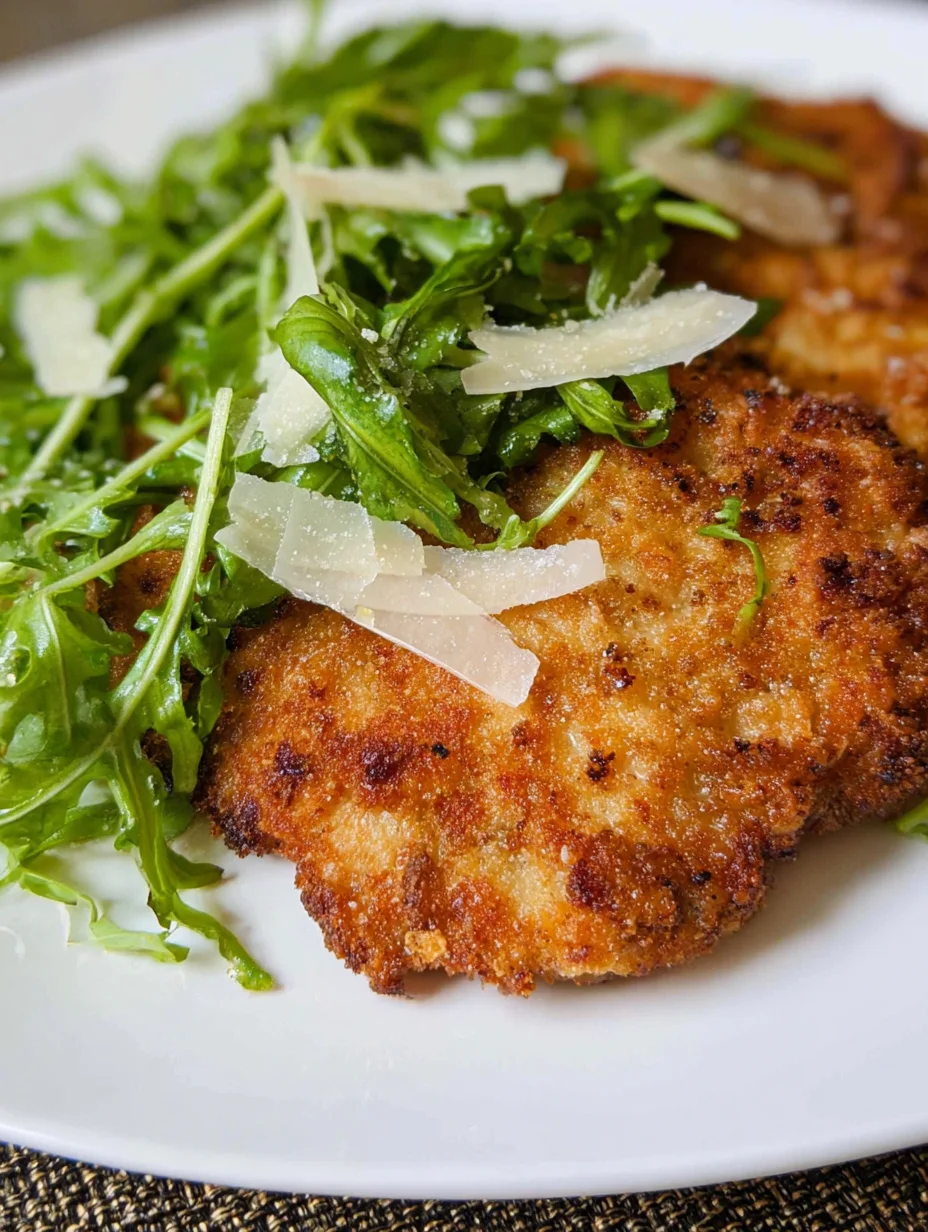
Fried Chicken Breast Recipe
This crispy fried chicken breast recipe is topped with arugula, shaved parmesan cheese, and a delicious lemon vinaigrette!
Timing
Recipe Details
Ingredients
- 01 4 thin chicken breasts
- 02 1 pint buttermilk
- 03 ¾ cup all-purpose flour
- 04 ¾ cup panko bread crumbs
- 05 1 egg
- 06 2 teaspoons salt
- 07 1 teaspoon garlic powder
- 08 1 teaspoon pepper
- 09 4 cups baby arugula ((loosely packed))
- 10 4 tablespoons shaved parmesan cheese
- 11 2 tablespoons olive oil
- 12 2 tablespoons butter
- 13 2 tablespoons lemon juice
- 14 ¼ cup olive oil
- 15 salt and pepper (to taste)
FILED UNDER:
NUTRITION FACTS (PER SERVING)
Nutrition information is calculated using an ingredient database and should be considered an estimate. In cases where multiple ingredient alternatives are given, the first listed is calculated for nutrition. Garnishes and optional ingredients are not included.
Frequently Asked Questions About Fried Chicken Breast
Can I make Fried Chicken Breast ahead of time?
Absolutely, you can brine and coat the chicken up to 4 hours in advance, then refrigerate until ready to fry. Just fry fresh for the best texture—pre-frying and reheating works but might lose some crisp. In my experience, this makes weeknight dinners a breeze without sacrificing quality.
How long does Fried Chicken Breast last in the fridge?
Your Fried Chicken Breast stays good for 3-4 days when stored properly in an airtight container. Beyond that, freeze it to extend life up to 2 months. Always reheat to 165°F to ensure it’s safe to eat.
Is Fried Chicken Breast healthy?
It can be when portioned right—lean chicken provides protein, but the frying adds calories from oil. Opt for less oil and skin removal to lighten it up; pair with veggies for balance. I’ve lightened mine with air fryer versions for guilt-free enjoyment.
What’s the best oil for frying Fried Chicken Breast?
Vegetable or canola oil works best due to high smoke points, keeping your Fried Chicken Breast crispy without burnt flavors. Peanut oil adds a nutty note if you like. Aim for fresh oil each time to avoid off-tastes.
Can I bake instead of fry the Fried Chicken Breast?
Yes, spray coated chicken with oil and bake at 400°F for 20-25 minutes, flipping halfway. It won’t be as crunchy, but it’s a healthier alternative. Check out our air fryer chicken breast recipe for similar results.
How do I get extra crispy Fried Chicken Breast?
Double-dredge in flour and let coated pieces rest 10 minutes before frying—this sets the crust for superior crunch in your Fried Chicken Breast. Use panko over regular breadcrumbs too. Patience during the brine also helps seal in juices.
Can I use bone-in chicken for this recipe?
Bone-in works, but adjust frying time to 10-12 minutes per side since it takes longer to cook through. Boneless is easier for even results in Fried Chicken Breast. If trying bone-in, brine longer for tenderness.
What if I don’t have buttermilk for Fried Chicken Breast?
Mix 2 cups milk with 2 tbsp vinegar or lemon juice and let sit 5 minutes—it mimics buttermilk perfectly for tenderizing. This hack saves trips to the store and keeps your Fried Chicken Breast on track. I’ve used it countless times with great success.
Final Thoughts
Wrapping up, this Fried Chicken Breast recipe has become a staple in my kitchen for its reliability and crowd-pleasing appeal—crispy, flavorful, and straightforward. I hope you’ve picked up a few tricks to make it your own and create some delicious memories. Give it a whirl this weekend; you won’t be disappointed—tag me in your results if you try it!


