
Homemade Choco Tacos

Remember those irresistible Choco Tacos from your childhood? I’ve always been a fan of that perfect crunch wrapped around creamy ice cream, all dipped in chocolate goodness. But let’s be honest, store-bought versions can sometimes disappoint with their soggy shells or artificial flavors. That’s why I set out to create my own Homemade Choco Tacos, and oh boy, was it worth it! These Homemade Choco Tacos bring back all the nostalgia with a fresh, customizable twist that you can whip up right in your kitchen.
In my experience, making Homemade Choco Tacos is easier than you might think, especially if you love experimenting with desserts. The key is getting that waffle shell just right—crisp on the outside, tender within—and pairing it with your favorite ice cream. Whether you’re hosting a summer party or just treating yourself after a long day, these Homemade Choco Tacos will steal the show. I’m excited to share this recipe with you so you can experience the joy of biting into one yourself.
Key Takeaways:
- Homemade Choco Tacos offer a customizable twist on the classic treat, letting you choose your favorite ice cream flavors.
- Prep and assembly take about 45 minutes, with freezing time for the perfect texture.
- The combination of crunchy shell, creamy filling, and chocolate coating creates an unbeatable flavor explosion.
- Work quickly when filling shells to prevent them from softening.
- Store extras in the freezer for up to a week for impromptu dessert cravings.
Why You’ll Adore This Homemade Choco Tacos
Endless Customization Options: What I love most about these Homemade Choco Tacos is how versatile they are—you can swap in any ice cream flavor, from classic vanilla to adventurous salted caramel. It’s a fun way to get the family involved in the kitchen. Plus, adding toppings like sprinkles or crushed cookies takes them to the next level.
Grab This Chef Knife Now - Almost Gone!

- Stays Razor-Sharp: Ice-hardened blade keeps its edge longer than ordinary knives
- Superior Grip Control: Unique finger hole design gives you perfect balance and safety
- Built to Last a Lifetime: Premium stainless steel blade with elegant beech wood handle
- ✓ Finally, a knife that stays sharp and feels comfortable in my hand
- ✓ Professional quality without the premium price tag
- ✓ Makes meal prep faster and more enjoyable
⏰ Only a few items left in stock - order soon
Beats Store-Bought Every Time: Here’s the thing: nothing compares to the fresh crunch of a just-made shell in your Homemade Choco Tacos. They’re free from preservatives, so you know exactly what’s going into every bite. And the satisfaction of creating them yourself? Pure bliss.
Perfect for Any Occasion: Whether it’s a movie night or a backyard barbecue, these Homemade Choco Tacos fit right in. They’re portable, mess-free once set, and always a crowd-pleaser that sparks smiles all around.
Healthier Indulgence: By controlling the ingredients, you can make your Homemade Choco Tacos with less sugar or even dairy-free options. It’s a guilt-free way to enjoy a beloved treat without overdoing it. Now, you might be thinking it’s too complicated, but trust me—it’s simpler than pie!

Essential Ingredients for Homemade Choco Tacos
Waffle Shell Batter: This starts with basic pantry staples like flour, cocoa powder, sugar, eggs, and melted butter. The cocoa gives the shells their signature chocolatey hue and subtle flavor that complements the ice cream perfectly. In my Homemade Choco Tacos, getting this batter thin and smooth is crucial for that delicate crispness you crave. Without it, the shells could turn out too thick or chewy.
Grab This Kitchen Scale Now — Best Precision Pick!

- Razor-Accurate Every Time: Dual-increment precision down to 0.1g — perfect for baking, meal prep, and portion control with g, oz, ml, and fl'oz modes.
- Smart Removable Bowl Design: Detachable bowl doubles as a protective case for compact storage. Tare function lets you weigh ingredients in any container with zero fuss.
- Built for Everyday Convenience: Auto-zero, tare function, low battery alert, overload indicator, and 2-minute auto-off to extend battery life — all in a sleek stainless steel build.
- ✓ "Perfect for baking — precise, lightweight, and stores easily without wasting counter space"
- ✓ "A game changer! Weighing ingredients is now way more accurate than measuring cups"
- ✓ "Love the 0.1g precision and backlight — best food scale I've owned. Highly recommend!"
⏰ Only a few items left in stock - order soon
Vanilla Ice Cream: Creamy, high-quality vanilla ice cream is the heart of these treats, providing a cool contrast to the warm shell. I recommend softening it slightly for easy scooping and filling. It’s what makes every Homemade Choco Tacos bite so indulgent and nostalgic. Feel free to use homemade if you’re feeling extra adventurous.
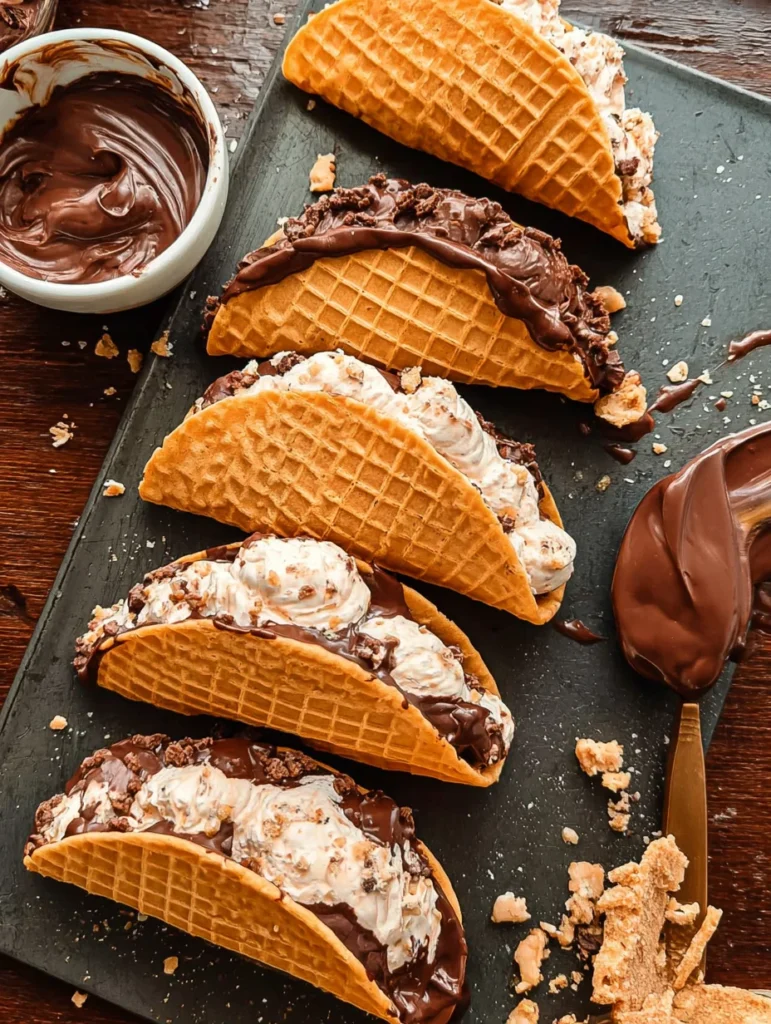
Chocolate Coating: Dark or milk chocolate chips melted with a touch of coconut oil create a glossy, snappy dip that seals in the ice cream. This layer not only adds richness but also prevents leaks in your Homemade Choco Tacos. Chopped peanuts or nuts rolled on the wet chocolate finish it off with crunch. It’s the magic that turns a simple assembly into a gourmet delight.
How to Make Homemade Choco Tacos
Prepare the Waffle Shells
Start by whisking together the flour, cocoa, sugar, eggs, and butter until you have a smooth batter—think pancake consistency but with a chocolate twist. Heat your waffle cone maker or a small skillet over medium heat, and pour in a thin layer of batter. Cook for about 1-2 minutes per side until crisp and golden; the aroma alone will have you dreaming of the finished Homemade Choco Tacos. Once done, quickly shape them into taco shells using a mold or foil—work fast as they harden quickly. In my experience, this step sets the foundation for that authentic crunch everyone loves.
Scoop and Fill with Ice Cream
Let the shells cool slightly before scooping in softened vanilla ice cream—about a golf ball-sized amount per shell works wonders. Press it gently to fill the crevices without overflowing, creating that perfect creamy pocket. Now, wrap each filled shell in plastic wrap and freeze for at least 30 minutes; this firms everything up beautifully. The chill time is key for the textures to meld, giving your Homemade Choco Tacos that professional pop. I always sneak a taste here—it’s irresistible!
Dip and Coat the Homemade Choco Tacos
Melt the chocolate chips with coconut oil in a microwave-safe bowl, stirring until silky smooth. Once the filled shells are frozen solid, dip the open ends into the chocolate, letting excess drip off. Immediately roll in chopped peanuts for that classic crunch, then return to the freezer on a parchment-lined tray for another 15-20 minutes. These Homemade Choco Tacos are now ready to devour, with the chocolate snapping perfectly against the cold ice cream. For an extra touch, check out our s’mores cookies recipe for inspiration on fun toppings.
Ingredients
- 1/2 cup all-purpose flour
- 1/4 cup unsweetened cocoa powder
- 1/4 cup granulated sugar
- 2 large eggs
- 3 tablespoons unsalted butter, melted
- 1 pint vanilla ice cream, softened
- 8 oz dark chocolate chips
- 1 tablespoon coconut oil
- 1/2 cup chopped peanuts
- Pinch of salt
Homemade Choco Tacos Instructions
- Whisk flour, cocoa, sugar, eggs, butter, and salt into a smooth batter. Heat waffle maker and cook thin layers into shells, shaping immediately into taco form. Cool on a wire rack.
- Scoop softened ice cream into each shell, wrap in plastic, and freeze for 30 minutes until firm.
- Melt chocolate with coconut oil. Dip frozen taco ends into chocolate, roll in peanuts, and freeze again for 15-20 minutes. Serve immediately or store in freezer.

Pro Tips for the Best Homemade Choco Tacos
Shell Shaping Hack: Use rolled-up foil to hold the taco shape while cooling—prevents breakage and ensures even crisping.
Ice Cream Softening: Let it sit at room temp for 10 minutes; this makes filling effortless without melting too much.
Chocolate Tempering: Stir vigorously after melting for a shiny, crack-free coating that lasts longer on your treats.
You Must Know
- These shells are best eaten fresh; they soften over time due to moisture from the ice cream.
- Use high-quality chocolate for better flavor and snap—avoid compound chocolate if possible.
- Freezing solid before dipping prevents the ice cream from sliding out during coating.
- This recipe yields about 8 tacos; scale up batter for larger batches.
How to Store Homemade Choco Tacos
To keep your Homemade Choco Tacos fresh, wrap each one individually in plastic wrap and store in an airtight container in the freezer for up to a week. Avoid the fridge, as they’ll get too soft from the humidity. For reheating the crunch, let them sit at room temp for just a minute before enjoying—though they’re best straight from the freezer. If they last that long, that is!
Customizing Your Homemade Choco Tacos
Feeling adventurous? Swap vanilla ice cream for strawberry or even a boozy version with coffee liqueur swirled in. For a nut-free twist, roll in crushed pretzels or sprinkles instead of peanuts. You can even bake the shells with added cinnamon for warmth. These Homemade Choco Tacos shine with personalization—check out our lemon blueberry cookies for fruity topping ideas that pair surprisingly well.
What to Serve with Homemade Choco Tacos
Pair these delightful treats with a scoop of fresh fruit salad on the side for a lighter contrast—berries and melon work wonders. A cold glass of milk or iced coffee balances the sweetness perfectly. For a full dessert spread, add some chewy banana bread slices. It’s all about creating a refreshing, shareable moment.
Homemade Choco Tacos
These homemade Choco Tacos are a fun, nostalgic treat that's perfect for summer! No churn fudge-swirled vanilla ice cream is stuffed inside a sweet and crispy waffle cone, then the whole thing is dipped in a chocolate and chopped peanut mixture.
Timing
Recipe Details
Ingredients
- 01 2 cups heavy cream, cold
- 02 1 14oz can sweetened condensed milk
- 03 1 tbsp or 2 tsp vanilla bean paste or vanilla extract
- 04 salt (Pinch of)
- 05 2 tablespoons cocoa powder
- 06 2 tablespoons granulated sugar
- 07 2 tablespoons heavy cream
- 08 1 tablespoon unsalted butter
- 09 1/2 teaspoon vanilla extract
- 10 salt (Pinch of)
- 11 2 egg whites
- 12 3 1/2 tablespoons granulated sugar
- 13 3 1/2 tablespoons brown sugar
- 14 3/4 teaspoon vanilla extract
- 15 1/8 teaspoon salt
- 16 2/3 cup flour
- 17 2 tbsp melted butter
- 18 1 1/2 cups chocolate chips
- 19 1 1/2 tablespoon coconut oil
- 20 3/4 cup finely chopped peanuts
Instructions
Make the fudge sauce for the ice cream ripple. In a small saucepan, whisk together the cocoa powder, sugar and heavy cream over medium-low heat. Once it starts to heat up, add in the butter and whisk until the butter is melted and the mixture is smooth and shiny. Remove from heat and whisk in the vanilla and salt. Set aside to cool.
Prepare the ice cream base. Add heavy cream to a stand mixer (or a bowl with a hand mixer) and beat until stiff peaks form (a few minutes). In a large bowl, mix together condensed milk, vanilla bean paste and salt. Add about 1 cup of the whipped cream in and gently fold it in, then add in the remaining whipped cream and fold until no lumps remain.
Layer the ice cream. Pour 1/4 of the ice cream base into a loaf pan, then drizzle on 1/3 of the fudge sauce. Repeat 3 more times, finishing with a layer of ice cream. Freeze until set – about 3 hours.
Make the waffle cones. Add egg whites, both sugars and vanilla extract to a bowl and beat with a hand mixer until well combined. Add in salt and half of the flour and continue mixing until smooth. Add in remaining flour and melted butter and mix until a smooth batter forms. The batter should be thick. Preheat waffle cone maker to just above medium heat. Place one heaping tablespoon of batter in the center of the waffle cone maker, then close it. Every waffle cone maker will cook differently, but ours took about 3 minutes to get golden brown. Remove with tongs, let cool for a few seconds, then (carefully) shape into a taco shape with your hands and hold in place for 15 seconds. They will harden in less than a minute.
Scoop ice cream into shells and freeze briefly. Scoop slightly softened ice cream into each of the “taco” cones, using a small spatula or the back of a spoon to smooth out the ice cream. Place in freezer for 10-15 minutes.
Prepare peanut-chocolate topping and assemble. Add chocolate chips and coconut oil to a microwave safe bowl. Microwave in 30 second intervals, stirring well between each interval, until fully melted. Stir in chopped peanuts. Dip the top of ice cream taco in the chocolate peanut mixture. Return to freezer for 5-10 minutes, or until hardened. Keep stored in freezer.
FILED UNDER:
NUTRITION FACTS (PER SERVING)
Nutrition information is calculated using an ingredient database and should be considered an estimate. In cases where multiple ingredient alternatives are given, the first listed is calculated for nutrition. Garnishes and optional ingredients are not included.
Frequently Asked Questions About Homemade Choco Tacos
Can I make Homemade Choco Tacos ahead of time?
Absolutely, you can prepare the shells and fillings a day in advance, then assemble and freeze. Just ensure they’re fully set before serving to maintain texture. It’s a great time-saver for parties.
How long does Homemade Choco Tacos last in the fridge?
They’re best kept in the freezer, not the fridge, to avoid sogginess—up to one week is ideal. Thaw slightly at room temp if needed, but eat within a day of taking out. Proper wrapping prevents freezer burn.
Are there gluten-free options for these tacos?
Yes, swap the flour for a 1:1 gluten-free blend, and you’re good to go. The shells hold up just as well. Try it for a dietary-friendly version everyone can enjoy.
Can I use a different chocolate for the coating?
Definitely—milk chocolate for sweetness or white for variety works fine in your Homemade Choco Tacos. Just melt with a fat like oil for smoothness. Experiment to find your favorite!
What if I don’t have a waffle maker?
No problem; use a crepe pan to cook thin batter and shape manually. It takes a bit more practice but yields great results. See our biscuits recipe for pan-handling tips.
How do I prevent the shells from breaking?
Cool them slowly and handle gently—your Homemade Choco Tacos shells are delicate fresh out of the maker. Reinforce with foil during shaping if needed.
Is this recipe kid-friendly?
Super kid-friendly! Let little ones help with scooping and dipping. It’s a fun, messy activity that’ll create lasting memories.
Can I add alcohol to the ice cream filling?
Yes, a splash of rum or baileys in the softened ice cream adds a grown-up twist to Homemade Choco Tacos. Freeze thoroughly to set the flavors.
Final Thoughts
There’s something truly special about Homemade Choco Tacos that brings joy in every crunchy, creamy bite—they’re a testament to simple pleasures done right. From the first waffle shell to the final chocolate dip, this recipe has been a game-changer in my dessert rotation. I encourage you to give it a try this weekend; you won’t regret it. Share your creations and tag us—we’d love to see your Homemade Choco Tacos shine!


